Table of Contents
 Aloe is our life. Nowadays, every health-conscious and those away from hygiene and healthy habits accept aloe vera’s importance. Everyone desires to grow their aloe plant in their pots or soil. Due to a lack of planting knowledge, many people face trouble growing aloe as sometimes it turns brown, dry, or its edges faint.
If you’re struggling to revive an aloe plant, don’t panic. Many tips and tricks that help your aloe plant bounce back. This article will outline the best ways to revive an aloe plant and provide helpful advice. So if you’re having trouble getting your aloe plant to recover, read on for help.
Also, learn how to revive an aloe plant and other dying plants with our comprehensive guide on how to revive dying plants.
How to Revive an Aloe Plant – Steps-By-Step Guide
Aloe plants have long been a popular addition to homes and gardens with their fleshy, succulent leaves and numerous healing properties. Their low maintenance and exceptional air purifying ability make them a favorite among seasoned gardeners and novices. However, despite their resilience, aloe plants can sometimes show signs of distress, leaving their caretakers concerned about their well-being. If you find yourself facing a struggling aloe, fret not! This comprehensive guide is here to help you navigate the path to revival and restore your aloe plant to its former glory.
Here is the step-by-step guide to follow for the best results.
Assessing the Aloe Plant’s Condition
Assessing the condition of your aloe plant is the first crucial step in the revival process. By carefully examining the plant, you can identify any signs of distress or underlying issues affecting its health. Here’s a breakdown of how to assess the aloe plant’s condition:
- Visual Inspection: Start by observing the overall appearance of the plant. Look for wilting, drooping, or discolored leaves and any signs of pest infestation or diseases.
- Leaf Examination: Check the leaves for discoloration, spots, or browning. Yellowing leaves could indicate overwatering, while brown and dry leaf tips may suggest underwatering or low humidity.
- Root Health: If the aloe is potted, carefully remove the plant from its container and examine the roots. Healthy roots should be firm and white or light brown. Black, mushy, or foul-smelling roots indicate root rot, a severe problem.
- Soil Moisture: Check the moisture level of the soil. Stick your finger about an inch into the soil to see if it’s dry or saturated. A well-draining soil that allows water to pass through without waterlogging is essential for aloe plants.
- Light Exposure: Evaluate the plant’s location and the sunlight it receives. Adequate light is crucial for aloe plants to thrive, but excessive direct sunlight can lead to sunburn.
Signs that Aloe Plant is Struggling
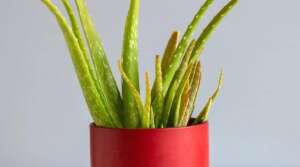
When an aloe plant struggles, it will exhibit various signs of distress. As a responsible plant caretaker, it’s essential to recognize these signs early to address the issues promptly. Here are some common signs that indicate an aloe plant is struggling:
- Wilting or Drooping Leaves: Aloe plants usually have upright, sturdy leaves. If you notice the leaves drooping or wilting, it may be a sign of underwatering, overwatering, or poor root health.
- Yellowing Leaves: Yellow leaves on an aloe plant can indicate several problems, such as overwatering, excessive sunlight exposure (sunburn), or nutrient deficiencies.
- Brown or Dry Leaf Tips: Brown, crispy leaf tips are often caused by underwatering or low humidity levels. The plant may be losing moisture faster than it can absorb.
- Soft or Mushy Leaves: Overwatering can lead to soft and mushy leaves. If the leaves feel squishy or show signs of rot, it indicates poor soil drainage or root rot.
- Stunted Growth: Aloe plants that are struggling may experience stunted growth, with new leaves being smaller or fewer in number than usual.
- Faded Leaf Color: If the aloe plant is not receiving enough light, its leaves may appear pale or faded compared to healthy, vibrant green leaves.
- Visible Pests: Pests such as aphids, mealybugs, or spider mites on the plant can indicate stress and may lead to further damage.
- Drooping or Sagging Leaves: Excessive heat or lack of proper sunlight can cause the leaves to bend or sag.
- Leaf Discoloration or Spots: Spots or discoloration on leaves can indicate diseases or fungal infections.
- Dry, Cracked Soil: Neglected aloe plants may have dry, cracked soil due to a prolonged lack of water.
To learn more about how long transplant shock lasts, read our comprehensive guide.
Adjusting the Aloe Vera Plant’s Environment
Adjusting the plant’s environment is crucial in reviving a struggling aloe plant. Aloe plants are naturally adapted to specific environmental conditions, and providing them with the right setting is essential for their health and well-being. Here’s a detailed explanation of how to adjust the plant’s environment:
- Sunlight: Aloe plants thrive in bright, indirect sunlight. If your aloe is not receiving enough light, move it to a spot with more natural light. On the other hand, if the plant is experiencing sunburn, gradually acclimate it to direct sunlight by providing filtered light initially and slowly increasing exposure over time.
- Temperature: Aloe plants prefer moderate temperatures between 60°F to 75°F (15°C to 24°C). Avoid placing the plant near cold drafts or heat sources, as extreme temperature fluctuations can stress the plant.
- Humidity: Aloe plants are relatively tolerant of low humidity levels but appreciate some humidity. You can increase humidity by misting the leaves occasionally or placing a tray of water near the plant.
- Air Circulation: Proper air circulation is essential for aloe plants, as it helps prevent fungal diseases. Ensure the plant is placed in a moderately ventilated area.
- Pot and Soil: Choose a well-draining pot for your aloe plant, as they dislike sitting in waterlogged soil. Use a cactus or succulent-specific potting mix that provides good aeration.
- Avoid Cold Exposure: Aloe plants are sensitive to cold temperatures, especially frost. Bring your aloe indoors or protect it with a frost cloth during freezing temperatures if you live in a region with cold winters.
- Adjusting Indoor Lighting: If you’re growing the aloe indoors, place it near a south or west-facing window to ensure it receives adequate light. You can also supplement with artificial grow lights if natural light is limited.
- Monitor the Plant’s Response: After adjusting to the plant’s environment, closely observe how the aloe responds. The plant may take some time to recover, so be patient and make further adjustments as needed.
Repotting the Aloe Plant
Repotting an aloe plant is a crucial process that involves transferring the plant to a new container with fresh soil. Repotting is usually necessary when the aloe plant outgrows its current pot, the soil becomes compacted or depleted, or there are signs of root congestion or rot. Here’s a detailed explanation of how to repot an aloe plant:
- Choose the Right Time: The best time to repot an aloe plant is during its active growing season, typically in the spring or early summer. Avoid repotting during the dormant winter months.
- Select a New Pot: Choose a slightly larger pot than the current one, allowing room for the aloe to grow. The new pot should have drainage holes to prevent waterlogging.
- Prepare the Potting Mix: Use a well-draining cactus or succulent potting mix, or create a mix by combining regular potting soil with sand or perlite to improve drainage.
- Gently Remove the Aloe Plant: Carefully remove it from its current pot. If the plant is stuck, tap the sides of the pot or gently loosen the soil around the edges.
- Inspect the Roots: Check the roots for any signs of damage, rot, or overgrowth. Trim off dead or rotten roots using clean, sharp scissors or pruning shears.
- Add Fresh Soil to the New Pot: Place a layer of fresh potting mix at the bottom of the new pot.
- Position the Aloe Plant: Center the aloe plant in the new pot and add more potting mix around the sides, gently pressing it down to eliminate air pockets.
- Water Sparingly: After repotting, refrain from watering the aloe immediately. Wait a few days to allow damaged roots to heal before resuming a regular watering schedule.
- Place in Indirect Light: Keep the repotted aloe plant in a location with bright, indirect light for a few weeks to help it recover from the transplant shock.
- Resume Regular Care: Once the aloe has acclimated to its new pot, resume its regular care routine, including appropriate watering and proper environmental conditions.
Pruning and Trimming Of Aloe Vera
Pruning and trimming are essential to keeping an aloe plant healthy and visually appealing. Removing dead, damaged, or discolored leaves helps the plant conserve energy and focus on new growth. To prune an aloe, use clean, sharp scissors or pruning shears to make precise cuts near the base of the leaf. Trimming off leggy or elongated stems encourages the development of a more compact and robust plant. Additionally, removing flower stalks after blooming redirects the plant’s energy back into the foliage. Remember to wear gloves when handling the leaves, as some aloe species have spiky edges that can irritate. Proper pruning and trimming improve the aloe’s aesthetics and promote its overall health and longevity.
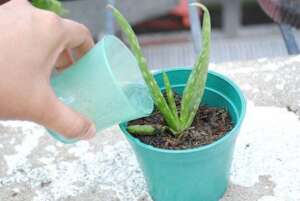
Adjusting Watering and Fertilization For Dying Aloe Vera Plant
Proper watering and fertilization are crucial for the well-being of an aloe plant. To adjust watering, it is essential to find the right balance. Overwatering can lead to root rot and other moisture-related issues, while underwatering can cause dehydration and wilting. A general rule is to water the aloe plant deeply but infrequently, allowing the soil to dry out between watering sessions. Adjust the watering frequency based on environmental conditions, such as temperature and humidity.
Fertilization is equally important for promoting healthy growth. However, aloe plants are relatively low-maintenance and do not require frequent fertilization. Choose a balanced, water-soluble fertilizer with a low nitrogen content, and apply it sparingly during the growing season, typically once every two to three months. Avoid fertilizing during the dormant winter months.
By fine-tuning the watering and fertilization practices, plant owners can provide their aloe with the nutrients and hydration it needs to thrive, ensuring a lush and vibrant plant that will reward them with its beauty and benefits.
Also Read: How to plant grass seed on hard dirt?
Reason for Aloe Plant Dying
Here we are providing the maximum reasons for aloe vera plants dying. However, it’s succulent and has a strong body. But still, if you don’t give proper care and treat the ill, Aloe can hardly survive. So be careful with your succulent friend.
Reasons for Aloe Plant Dying
Aloe plants are generally known for their resilience and ability to withstand tough conditions, but they can still face challenges that lead to their demise. Understanding the common reasons behind an aloe plant dying is crucial for preventing such occurrences and promoting their longevity.
1. Overwatering: Overwatering is one of the leading causes of aloe plant death. Aloe plants are succulents that store water in their fleshy leaves, making them susceptible to rot if their roots sit in excessively wet soil. This condition deprives the plant of oxygen and causes the roots to decay, leading to a lack of water and nutrient uptake, wilting, and eventual death.
2. Underwatering: On the flip side, underwatering can also prove fatal to aloe plants. When deprived of adequate water, these succulents cannot sustain themselves, leading to severe dehydration, wilting, and a gradual decline in health.
3. Poor Drainage: Aloe plants require well-draining soil to prevent water from pooling around the roots. Soil that retains too much moisture can lead to root rot, even if the plant is not overwatered directly.
4. Sunburn: Aloes need bright but indirect sunlight to thrive. Exposing them to intense, direct sunlight for extended periods can cause sunburn, which appears as brown or white patches on the leaves. Severe sunburn can lead to irreparable damage and plant death.
5. Extreme Temperatures: Aloes prefer moderate temperatures and can suffer in extreme heat or cold. Freezing temperatures can lead to frost damage, while prolonged exposure to high heat can cause dehydration and stress.
6. Pests and Diseases: Pests like aphids, mealybugs, and spider mites can infest aloe plants, draining their vital nutrients and causing overall weakness. Diseases like fungal infections can also affect the plant’s health and lead to its eventual demise.
7. Pot-Bound Roots: When aloe plants outgrow their pots and their roots become pot-bound, it restricts their ability to access water and nutrients, leading to stunted growth and a weakened state.
How To Revive Aloe Vera Root Rot?
Aloe vera root rot can be a challenging issue to address, but with prompt action and careful attention, it is possible to revive the plant. Here’s a step-by-step guide to help you tackle aloe vera root rot:
- Assess the Damage: Carefully remove the aloe plant from its pot and examine the roots. Healthy roots are firm and light-colored, while rotted roots appear dark, mushy, and emit foul odors. Trim away all the affected roots using sterilized pruning shears.
- Report with Fresh Soil: Choose a clean, well-draining pot slightly larger than the previous one. Fill it with a new batch of well-draining cactus or succulent potting mix. Avoid using old soil to prevent reinfection.
- Let the Roots Dry: Allow the aloe plant’s roots to dry for a few hours before repotting. This step helps to minimize the risk of further rot development.
- Replant the Aloe: Place the aloe plant in the new pot, spreading its roots evenly. Add more potting mix around the sides and lightly tamp it to secure the plant.
- Limit Watering: For the first few weeks, water the aloe sparingly. Let the soil dry out between waterings, as overwatering can exacerbate root rot. Adjust the watering frequency based on the plant’s recovery progress.
- Provide Optimal Conditions: Place the aloe in a location with bright, indirect sunlight to promote healing and growth. Avoid exposing the plant to extreme temperatures or drafts.
- Monitor and Remove Diseased Parts: Monitor the aloe plant for any signs of ongoing root rot or wilting. If you notice any new rot, promptly trim the affected parts to prevent the spread.
- Patience and Vigilance: Reviving an aloe vera suffering from root rot takes time and diligence. Be patient and attentive to the plant’s needs, and avoid making sudden changes that could stress it further.
Learn how to save plants after a frost with our helpful guide on how to save plants after a frost.
Is Coffee Good For Sick Aloe Vera Plant?
No, coffee is not good for a sick aloe vera plant. It can be harmful to the plant’s health. Coffee contains caffeine and other chemicals that can harm aloe vera and most other houseplants.
Here’s why coffee is not suitable for a sick aloe vera plant:
- Acidity: Coffee is acidic, and aloe vera plants prefer a slightly alkaline environment. Applying acidic substances like coffee to the soil can disrupt the pH balance, leading to nutrient imbalances and stressing the plant.
- Caffeine and Chemicals: Caffeine and other chemicals present in coffee can be toxic to plants when applied directly to the soil. They can interfere with the plant’s metabolic processes and impede nutrient absorption, weakening the already sick aloe vera.
- Water Retention: Coffee grounds tend to retain water, and aloe vera plants are susceptible to root rot when sitting in waterlogged soil. Excessive moisture can exacerbate the plant’s health issues and hinder its recovery.
Instead of using coffee, it’s best to focus on the essential aspects of reviving a sick aloe vera plant, such as adjusting watering, repotting in fresh soil, providing adequate light, and addressing any pests or diseases. Proper care and attention to the plant’s needs are essential for its recovery.
How To Fix An Overwatered Aloe Plant?
Fixing an overwatered aloe plant is critical to prevent root rot and save the plant from further damage. Overwatering deprives the plant’s roots of oxygen, leading to rot and eventual decline. To remedy the situation and revive the aloe plant, follow these steps:
- Assess the Damage: Carefully remove the aloe plant from its pot and inspect the roots. Healthy roots are firm and white or light brown, while overwatered roots may appear mushy and dark. Trim away any rotting or dead roots using sterilized pruning shears.
- Let it Dry: Allow the aloe plant and its roots to dry for a few hours or up to a day. Placing the plant in a well-ventilated area will speed up the drying process.
- A report in Dry Soil: Choose a clean pot with drainage holes, and fill it with fresh, well-draining cactus or succulent potting mix. Do not use the old soil to avoid reintroducing excess moisture.
- Replant the Aloe: Place the aloe plant in the new pot, spreading its roots evenly. Add more potting mix around the sides, but avoid packing the soil tightly.
- Adjust Watering: In the future, adjust the watering schedule to avoid overwatering. Allow the soil to dry out between waterings, and use the “soak and dry” method. Water deeply but less frequently to prevent waterlogged conditions.
- Provide Adequate Light: Place the aloe plant in a spot with bright, indirect sunlight. Proper light exposure helps the plant recover and prevents further stress.
- Monitor Progress: Keep a close eye on the aloe plant’s progress. It may take some time for the plant to recover fully. Be patient and avoid making drastic changes to the care routine.
- Avoid Fertilizing: Refrain from fertilizing the plant immediately after repotting. Allow the aloe to recover before reintroducing nutrients.
What If Revive Aloe Vera Is Not Growing?
It can be disheartening if you have tried various methods to revive an aloe vera plant, but it is still not showing signs of growth. However, there are several potential reasons why an aloe vera may not be growing despite your efforts:
- Irreparable Damage: In some cases, the damage to the aloe vera plant may be too severe to overcome, especially if the root system has been extensively affected or if the plant has been declining for an extended period.
- Lingering Issues: There might be unresolved problems with the plant’s environment, such as poor drainage, inadequate sunlight, or inconsistent watering, hindering growth.
- Nutrient Deficiency: If the plant lacks essential nutrients due to poor soil or infrequent fertilization, it may struggle to grow and regain vitality.
- Underlying Diseases or Pests: Hidden diseases or pests that have not been effectively treated can continue to harm the plant and inhibit growth.
- Incorrect Diagnosis: Sometimes, the initial diagnosis of the problem may need to be corrected, leading to inappropriate treatment methods.
If your efforts to revive the aloe vera have not yielded positive results, consider the following steps:
- Reevaluate Care: Double-check the plant’s care routine and ensure you provide the right amount of light, water, and appropriate soil conditions.
- Report: If the plant is still in the same pot and soil, consider repotting it with fresh, well-draining soil to improve its chances of recovery.
- Trimming and Pruning: Remove any remaining unhealthy or damaged parts of the plant to allow it to focus its energy on new growth.
- Consult an Expert: If unsure about the plant’s condition or how to proceed, seek advice from a local nursery or plant expert who can provide personalized guidance.
FAQs
Why my aloe plant is dying?
The main issue with your aloe plant is watering; You have to be very careful with when to water your plant. Soil shouldn’t be moist all the time.
What does an over-watered aloe look like?
If the plant’s leaves turn yellowish, the stem is mushy, and the roots will rot, it means it was overwatered.
Can a rotting aloe plant be saved?
If you replant your aloe plant properly, there is a chance that you can save your rotting plant.
Also, you can visit our guide about the incredible benefits of a snake plant air purifier in our article.
Conclusion
Thank you for reading. The aloe plant is a necessity of every home nowadays. So, we have discussed the different ways to revive an aloe plant and help it return to its old glory. Aloe plants are unique and can help improve skin health and provide severe medicinal benefits. Following the ways in this article can help your aloe plant return to its healthy self. Please comment to let us know how useful this article is.