Table of Contents
 Plastic is non-biodegradable which makes plastic bottles a major culprit in environmental pollution. It’s one of the most commonly sold items and is available in surplus in almost every home on the plant.
When you purchase Cola or mineral water from the store, what do you do with the bottle once it’s empty? Throw it away? Can you imagine the number of plastic bottles you throw away every month and the contribution it makes to the landfills in a year? Let’s just say it’s massive!
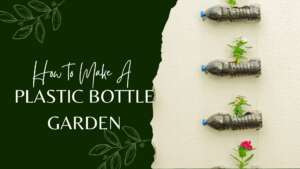
Cut down on some of the environmental damage by reusing these plastic bottles. Here, you’ll learn how to make a plastic bottle garden. This recycled plastic bottle garden uses no special material or tools and can turn a waste product into something beautiful for you and beneficial for the environment. Let’s see how it’s done.
What you’ll need
You won’t need anything special. Most of the material will already be available at home. You will just need to purchase some seeds from the garden store.
- Plastic bottles
- Potting soil
- Small pebbles
- Seeds
- Knife
- Scissors
- Marker
- Acrylic paint and paintbrush (optional)
Planning
Before starting to build your DIY plastic bottle garden, think about where you’ll place it. Here are some ideas that you can try out:
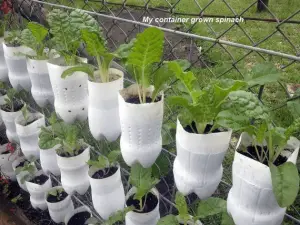
- If you have a large rack with multiple shelves, you can simply line each of the planters on the shelves until it’s all filled.
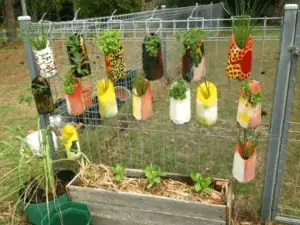
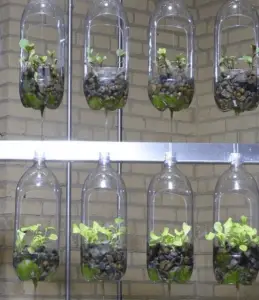
- Make a hanging garden by generating a string of planters, attaching them to one another using cotton strings. The topmost planter can be screwed to the wall or ceiling. Make multiple strings to fill up the entire wall or a large area.
- Horizontal planters are also possible. You can cut off a portion of the sides for the plant to grow. Drill holes on the other side for proper drainage.
- You can also cut the bottle in half before planting the seed. This will make smaller planters if that’s what suits you.
- Paint the plastic bottles before planting the seed to give it even more of a professional touch. Here are some ideas:
Procedure to follow
By now, you will have some idea as to how you want your plastic bottle garden to look. Now it’s time to start building one. Here’s how to make a plastic bottle garden:
Step 1: Mark the bottle
- Use the marker to mark halfway around the circumference of the plastic bottle if you want to utilize half the plastic bottle for each planter.
- If you’re utilizing the entire bottle for each of your planters, mark a rectangle on one of the sides, depending on whether you want the planter to be vertical or horizontal.
Step 2: Cut the bottle
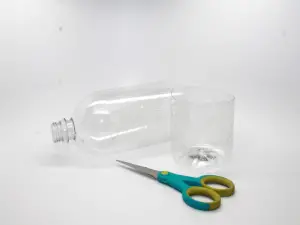
- Use a knife or scissors to cut out half of the bottle. You will first need to pierce a hole and then cut the entire circumference.
- If it’s a rectangle that you have marked in the previous step, cut that out using the utility knife that you have or scissors.
Step 3: include drainage holes
Plants need a good drainage system around their roots, otherwise, they may start to rot soon. Including drainage holes in a plastic bottle is very simple.
- Depending on where the base of the planter will be, use a knife to drill multiple small holes into the base. You can also use a heated needle to do so. It will make the process even easier.
- Wash the bottle after cutting to remove any residues that remain.
Step 4: Painting
Now, this step is entirely optional. Your plastic garden will look beautiful even if you don’t paint it.
- Using a paintbrush and acrylic paint, paint all of your planters.
- You will need to apply multiple layers, allowing some time for the paint to dry between coats.
- Spray paint can also be used for the same.
Step 5: Preparing the soil
Moving on with our water bottle gardening, we need to prepare the soil once the planter is ready. Here is what we will do:
- Include some small pebbles at the base of the planter, depending on whether the bottle will stand horizontal or vertical. Including pebbles is optional but will help in providing good drainage to the plant.
- Next, include the potting soil until it’s halfway from the top of the planter.
Step 6: Sowing the seed
- Take some seeds and include them in the soil. Take some more soil to add over the seeds to cover them completely.
- Instead of sowing the seed, you can also add a small plant. After placing the plant in the soil, add more soil until the roots are completely covered.
- Make sure that there is at least an inch of height remaining between the top of the soil and the top of the planter.
Step 7: Set up the garden
Repeat all of the above steps to make multiple planters. Utilize as many plastic bottles as you can. Once all the planters are ready, we are all set for the next step: how to make bottle garden.
- Arrange the planters on the shelves, or tie them to each other with cotton strings, depending on how you have planned your garden.
- If you are attaching them to one another, you will need to pierce holes into the bottles on both sides to tie the strings.
- Include a hook on the ceiling or the wall if you’re setting up a hanging garden of plastic bottles.
Step 8: Water your garden
Once the garden is all set up, time to water it. Depending on what type of plant or seed you have included in the planters, water them just enough to keep the soil moist. Some plants ask for more water than others; you can ask an expert to guide you, depending on the plant variety you have chosen.
Conclusion
So you see how simple it is to make something heavenly out of what you considered to be waste! Do the environment a favor and reuse these plastic bottles; make something good out of them. You will find plenty of ideas on the internet.
Once you know how to make a plastic bottle garden, you can keep including new planters in your garden as more and more plastic bottles start piling up in your home. It’s much better than throwing them away.