Table of Contents
 If you’re a fan of nature and landscapes, you must have fantasized about a dream garden. What is the first thing you see when you imagine a classic garden from a small countryside abode? It’s probably an arched garden bridge over a creek, isn’t it? If you have a garden, you can build one yourself and bring your dream garden to life! It’s not that hard either.
You’ll learn how to build a garden bridge here. It is functional and lets you cross over from one side of the garden to the other if there’s a small pond or uneven surface. Of course, the main reason for adding a garden bridge is the charm it adds to your place.
What you’ll need
You’ll need to gather a few things from the nearest hardware store before you can begin your project. Here’s a list of what you’ll need:
- Two 2×12 cedar planks, for stringers
- Thirteen 2×6 cedar planks, for floor
- Two 8inch 4×4 treated cedar, for handrails
- 25” bendable channel
- Paint
- Paintbrush
- 2” screws
- Pencil
- Circular saw
- Drill
- Jigsaw
- Screwdriver
- Hammer
- Clamps
Step-by-step guide on making a garden bridge
If you’ve got your supplies ready, we are all set to start building our classic arched garden bridge. Follow the steps to see how to build a garden bridge:
Step 1: Making arched stringers
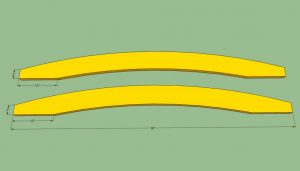
- Set the 2×12 plank on the ground and place 2 nails at the two ends of the plank. They should be at the same vertical level.
- Bend the bendable plastic channel between the two nails and use it to trace out an arch on the plank using a pencil.
- For tracing out the lower side of the stringer, place nails at a good distance below the first ones. But these new nails should have a smaller horizontal distance among one another.
- Use the same bendable channel between the nails to trace out another arch.
- Now that you have the drawing ready, use a circular saw to cut the upper arched side.
- A jigsaw will be easier to work with when cutting the lower side.
- Now that you have one support stringer ready, you will simply place it over the other 2×12 inch plank that you have with you.
- Trace out the second support stringer with the help of the first one.
- Cut it with your saw.
Step 2: Making the floor
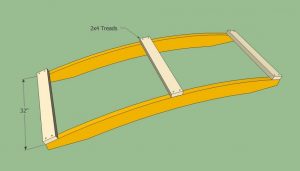
Now that you have the support ready, you’ll be making the floor of your bridge. Here is what you’ll do:
- Make the floor planks by cutting the 2×6 cedar into 36-inch planks.
- Lay the two stringers on the ground parallel to each other with a distance of 32 inches between them.
- Now place one of the 36-inch planks over the two stringers at one end. Make sure the plank is protruding equal distance from both ends.
- Drill the 2” screws on each end such that they pass through the plank and the stringer and fuse them together.
- Now place a second plank over the stringers protruding the same distance from both ends and drill it.
- Continue the process until you reach the other end of the stringers.
Step 3: Handrails
Now, handrails are entirely optional. Your bridge is complete even if you skip this step. Many people skip this step either to save wood, save efforts or simply because they like this style better. If you want to include handrails to your bridge, here are the steps to follow:
- To make the posts, cut the 4×4 planks into four 32” posts.
- For the handrails, cut two more lengths of the planks, each being 32”. Doing so will result in straight handrails.
- If you want arched handrails, you will need to use 2×12 cedar and follow the procedure used in step 1.
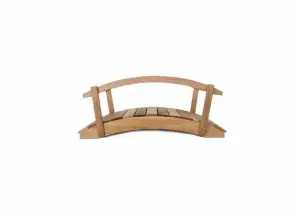
Step 4: Putting it together
Now that we have our components ready, let’s put them all together to see how to build a garden bridge with an arch:
- From each of the ends of your bridge, remove the second floor plank and the third one.
- Position the post vertically in the empty space and screw it with the stringer.
- Screw all the four posts onto the stringer at the right locations.
- As for the planks that you have removed, cut them into an appropriate size to fit between the posts.
- Relace them onto the stringer and screw them at their positions.
- Now place the handrail onto the posts and screw them at both ends.
- Repeat the procedure with the other handrail.
Step 5: Finishing touches
Your bridge is ready! All it requires are some finishing touches and you’re done. Here is what you will do:
- Use a wood stain of your choice to paint the bridge.
- Apply multiple layers of stain, allowing time for the paint to dry before applying the next coat.
- Take the bridge to the place where you’ll position it.
- You may need to even out the surface at both ends of the bridge.
- Make sure that the bridge is stable when placed at the required spot.
That’s how to build an arched bridge over a creek. With the right tools, it’s not hard. You may even complete it in a day if you set your mind to it.
Useful tips to follow:
Before getting to work, here are some tips you should know to give your project an even more of a professional touch:
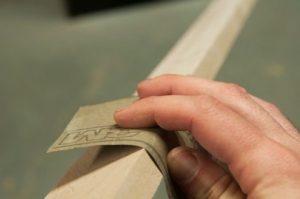
- Sand and wipe all the surfaces that you cut. This will prevent the wood from damage and will also make sure there are no sharp ends that may hurt you or others who use the bridge.
- Apply a layer of clear polyurethane over the painted bridge. This protects the wood from water and other elements. This is especially important for your bridge to stay in shape because it’s installed outdoors.
Conclusion
Now that you have learned how to build a garden bridge, time to get to work. Get your supplies ready and create a bridge to surprise your family.
That’s it! You just created a beautiful bridge for a picturesque spot in your garden! A job well done, and without the help of a carpenter; you ought to be proud of it.
